







What is GeoRoutePlanner?
GeoRoutePlanner is a route planner and print tool for geocaching. With the app, you can import geocaches from a GPX file, Pocket Query, Geocaching list or directly from Geocaching.com.
In the cache list, you can change the order of the caches, create a print list and export the route again as a GPX file for your GPS or to save for later.
With GeoRoutePlanner, you can easily plan a route for a great day of geocaching.

Table of Contents
- Downloading and Installing GeoRoutePlanner
- Opening GeoRoutePlanner
- Starting a route
- Importing caches
- Cache list and how to edit it
- Using waypoints
- Adding waypoints
- Map view
- Printing the cache list
- Printing the map
- Exporting GPX
- Settings
- Lab Caches
- Practical tips
- Website and manuals
- FAQ
1. Downloading and Installing GeoRoutePlanner
This manual is based on version 1.0.0. (Firefox 1.0.1)
To use GeoRoutePlanner, you need to have Google Chrome or Microsoft Edge installed on your desktop, because GeoRoutePlanner is a plug-in (extension). This software (extension) is compatible with Windows and macOS.

GeoRoutePlanner does not work on a smartphone or tablet.
1.1 Downloading and installing
Choose which browser you want to use to download the extension:

Download GeoRoutePlanner voor Google Chrome from the Chrome Web Store.
- Click the blue “Add to Chrome” button in the top right. The GeoRoutePlanner plug-in will now be added to Google Chrome.
- Go to step 1.2

Download GeoRoutePlanner voor Microsoft Edge – from the Microsoft Edge Add-ons.
- Click the blue “Get” button in the top right. The GeoRoutePlanner plug-in will now be added to Microsoft Edge.
- Then click ‘Add extention‘
- Go to step 1.2

Download GeoRoutePlanner voor Mozilla Firefox – from the Mozilla Firefox Add-ons.
- Click the blue button “Add to Firefox” in the top right. The GeoRoutePlanner plug-in will now be added to Firefox.
- Then click ‘Add‘.
- Check the option ‘Pin extension to toolbar‘.
- And click ‘OK‘ and proceed to step 2.
1.2 Pin icon to toolbar
To keep the icon permanently visible in the toolbar, follow the steps below. After that, you can open GeoRoutePlanner.
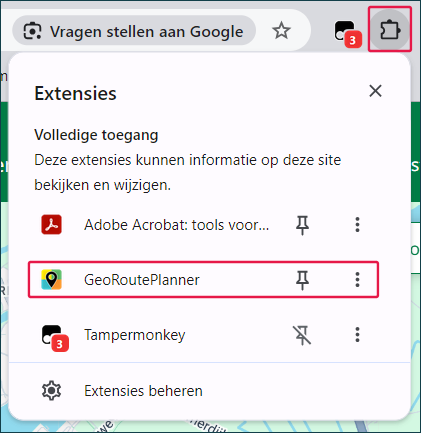
- After installation, click the ‘puzzle piece’.
- Search for GeoRoutePlanner.
- Then click the ‘pushpin/pin’ icon.
- The GeoRoutePlanner icon will then remain visible in the top bar.
2. Opening GeoRoutePlanner

Open GeoRoutePlanner using the extension icon in the top right of the browser.
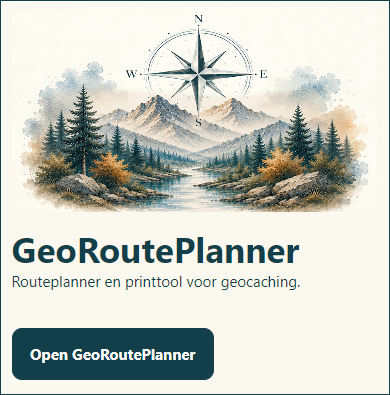
- In the pop-up screen, click ‘Open GeoRoutePlanner‘. The route planner then opens in a new tab.

The top menu bar contains the main buttons:
- Import GPX: add a GPX file, Geocaching list or Pocket Query.
- Export GPX: create a new GPX file from the route.
- Print list: print the cache list.
- Open map: open the map view.
- Waypoint: manually add a point, such as a parking area, restaurant, picnic spot, start or finish.
- Settings: change the route or the map.
- Clear: remove the current route.
On the right side of the menu bar, you can choose the desired language by clicking the flag icons for Dutch, English, German or French.
By default, GeoRoutePlanner uses your computer’s system language: Dutch, English, German or French. If your system language is not available in GeoRoutePlanner, English is selected automatically. You can always change this yourself.
3. Starting a route
The route name is shown above the cache list. By default, a new route is given a name
For example:
GeoRoutePlanner 2026-06-12
You can change this name yourself. This name is also used on the printout and as the file name when exporting the GPX.
If you leave this field empty, the name ‘GeoRoutePlanner + current date’ will be used when you export a GPX file.
4. Importing caches
You can add caches in several ways.
4.1 Importing a GPX or ZIP file

- Click ‘Import GPX‘ and choose a GPX file or a Pocket Query ZIP file.
GeoRoutePlanner reads the following files:
- GPX file
- Geocache page of the cache
- Geocaching lists from Geocaching.com
- Adventure Lab caches (see section 13)
- GSAK
- Pocket Query (ZIP file)
GeoRoutePlanner reads the caches and places them in the cache list.
Where possible, extra data is included, such as:
- GC code
- cache name
- cache type
- container size
- difficulty and terrain
- coordinate
- hint
- waypoints
- extra GPX information for export to GPS
4.2 Adding a cache from Geocaching.com
On cache pages on Geocaching.com, a button appears ‘Add to GeoRoutePlanner’ to add the cache to GeoRoutePlanner. You can also add a selected cache from the map pages on Geocaching.com via the pop-up.
Supported map pages include:
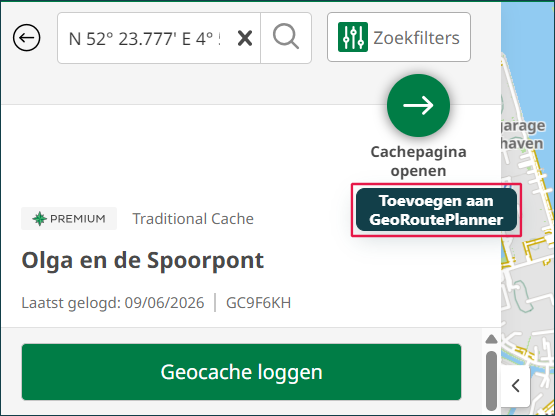
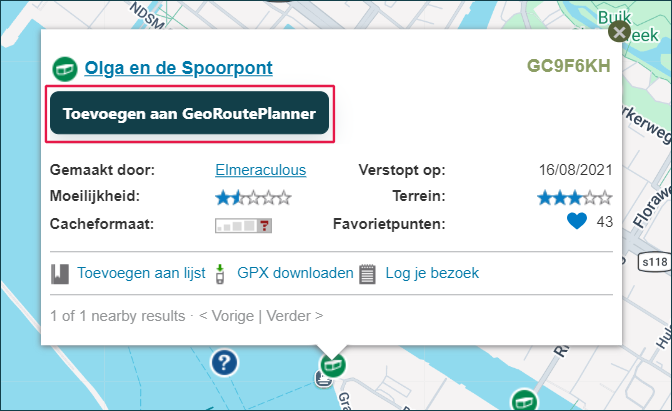
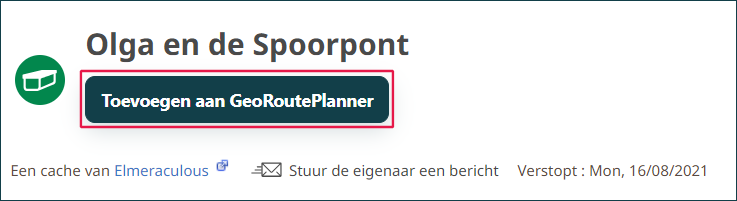
When the cache has been added, the message ‘✓ In cache list’ appears. The text on the button then changes to ‘Added to GeoRoutePlanner’ or ‘Update in GeoRoutePlanner’.
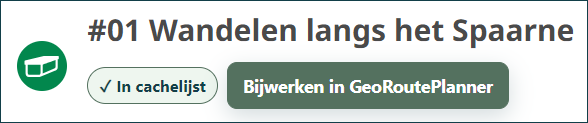
If you or the cache owner have changed something about the geocache on Geocaching.com, you can click the ‘Update in GeoRoutePlanner’ button. The data below will then be updated automatically.
- cache name
- coordinate
- container size
- D/T value
The fields below stay as they are:
- Waypoint (see section 6)
- Hint + own text (see section 4.3)
- Own text (see section 4.3)
Note: If the cache owner changes the hint, it is not included in the update. If the hint needs to be changed, you can do this by removing the cache and adding it again.
5. Cache list and how to edit it

5.1 What information is shown for each cache
In the list, you can see the following for each cache:
- route number
- type of geocache
- GC code (clickable to open the cache page)
- the + sign for an extra field to add your own text
- waypoint (option)
- cache name
- container size and D/T value
- distance to previous cache and cumulative distance (in km or m)
- coordinate
- hint (extra own text can also be added here)
5.2 Editing the route cache list
- You can change the order of the list by dragging a cache row when the cursor in the row changes into a ‘hand’ .
- You can also click the route number and enter a new route number directly.
- The GC code is clickable and opens the corresponding cache page on geocaching.com.
- With the search function at the top right of the list, you can search by cache name or GC code. The list is then filtered based on your search.
5.3 Editing data

In the cache list, you can edit the fields below yourself:
- cache name
- coordinate (after reloading the map, this is also updated in the map view and in the GPX file to be exported)
- hint
- waypoint description
- the option to add extra own text by clicking the plus sign.
In text fields, you can select text and make it bold with ‘Ctrl+B‘. When you paste text with ‘Ctrl+V’, GeoRoutePlanner does not retain external formatting. This keeps the text clear and consistent with the rest of the list.
6. Using waypoints

- Click the ‘WP 2’ button to show or hide the waypoints. The number indicates how many waypoints belong to this cache.

Waypoints can include:
- parking
- final
- waypoints with a coordinate
- hidden waypoints without a fixed coordinate
For each waypoint, you can edit the description. In the waypoint field, you can also add your own calculations, instructions or notes.
If you expand the waypoints in the cache list, this information is also shown on the print list.
Recognized parking waypoints are automatically placed at the top of the waypoint list by GeoRoutePlanner.
Waypoints are only visible when you import a Pocket Query, Geocaching list or a GPX file for a single cache from the cache page.
7. Adding waypoints
Use the Waypoint button to add your own point to the route.

- Click the ‘Waypoint’ button to open the pop-up screen below.

- If you leave ‘Name’ empty, the default description is filled in.
- Under ‘Type’ you can choose from the waypoints below. Each waypoint has its own icon.
- parking
- start
- waypoint
- picnic spot
- shop
- finish
- house
- camping
- Under ‘Coordinate’ enter the correct coordinate.
8. Map view

- Click the ‘Open map’ button to view the route on the map in a new tab.

In the menu bar of the map view, you can:
- Choose the map layer:
- standard
- humanitarian
- topographic
- cycling/walking
- print friendly
- Choose the print format
- screen
- A4 portrait
- A4 landscape
- A5
- Open settings
- show route line on map (from cache to cache)
- start number (default 1)
- marker on map (route number or cache type)
- Print the map
- Close the map view window
- Change language with the flags
On the map, you can perform several actions:
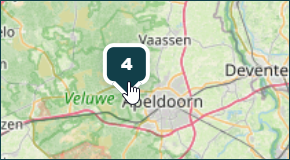
- When you click a ‘marker’, a pop-up window appears with information about the cache or waypoint.
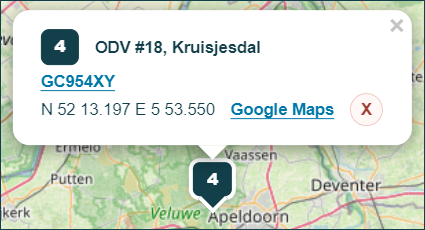
From this pop-up, you can:
- Click the GC code to open the cache page.
- View the location in Google Maps .
- Change the route number by clicking it.
- Remove the point from the route list by clicking the red cross in the bottom right.
- Use the grey cross in the top right to close the window.
For cache type markers, a small dot on the map indicates the exact coordinate location.
Adding a waypoint via the map:
Click a location on the map to add a waypoint. A window opens where you can enter the name and type of the waypoint (see section 7).
The clicked location is automatically used as the coordinate. You can still change this coordinate afterwards.
9. Printing the cache list

- Click ‘Print list‘ to print a cache list.
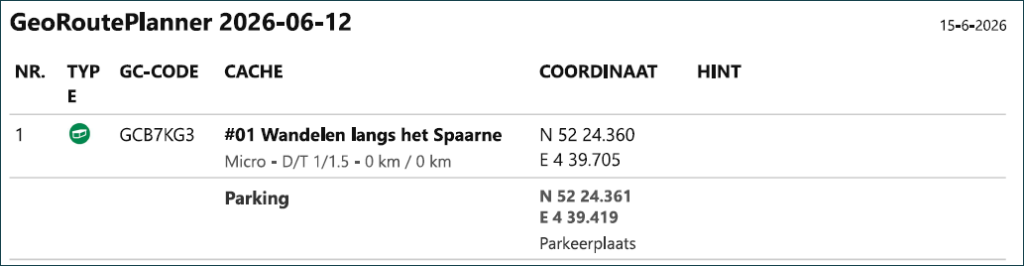
The print list shows:
- the name given to the list
- print date (top right)
- route number
- type of geocache
- GC code
- cache name
- container size and D/T value
- coordinate
- hint
- waypoints that you clicked and expanded in the cache list.
- any own text you entered
The print list follows the same order as the cache list.
In the settings, you can choose the font size for printing.
- small
- normal
10. Printing the map

To print the map:
- click ‘Open map‘
- then click ‘Print map‘
You can now choose from several print formats:
- A4 portrait
- A4 landscape
- A5
The printed map shows the route name and print date. When you change the print format, the map is re-centered on the route.
11. Exporting GPX

- Click Export GPX to create a new GPX file from your route.
The file may contain extra Geocaching information, so GPS devices can show more data than just the name and coordinate.
In the settings, you can choose whether waypoints are included in the GPX export.
12. Settings
The settings window is divided into two sections, ‘Cache list’ and ‘Map’.
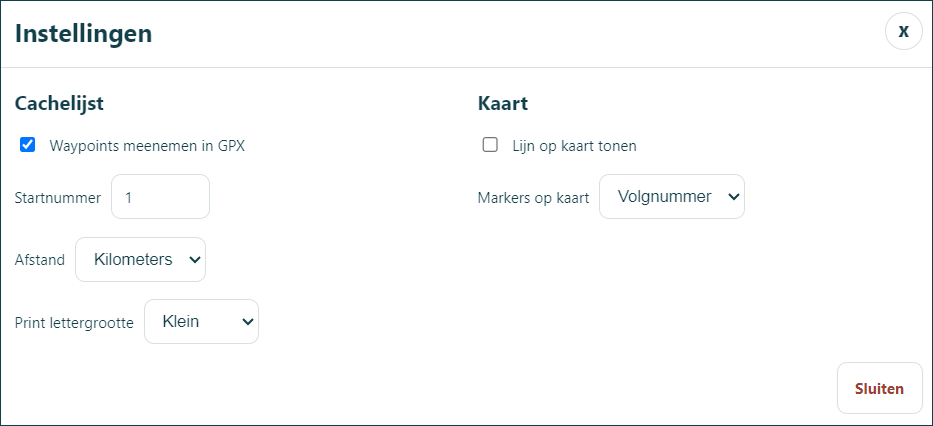
12.1 Cache list
Here you can set:
- include waypoints in the GPX export file.
- start number
- distance unit: kilometers or miles
- print font size: small or normal
12.2 Map
Here you can set:
- show line from point to point on the map
- markers on map: route number or cache type
New routes do not show a line on the map by default.
13. Lab Caches
GeoRoutePlanner can import Adventure Lab cache GPX files. Adventure Lab caches usually have an LC code instead of a GC code.
If a Lab cache question is recognized in the GPX file, it will be placed in the hint field of the cache list.
Via the website lab2gpx.gcutils.de, you can download a GPX file of Adventure Labs and import it into GeoRoutePlanner.
14. Practical tips
- After importing, always check the order of the caches in the list before printing or exporting.
- Only expand waypoints for caches where you need them on the print list.
- Use waypoints for parking, start and finish; this makes a route clearer in the field.
- Via Map view, you can view the route you created on the map.
- Click a marker on the map to open the pop-up window. From this window, you can open Google Maps for Street View or extra map information.
- Give the route a name you recognize before exporting or printing it.
15. Website and manuals
More information and future manuals will be available via:
- Website: https://www.geocachinginfo.nl
- Manuals: https://www.geocachinginfo.nl/georouteplanner

16. FAQ
GeoRoutePlanner is a Chrome extension that lets you collect geocaches in your own cache list. You can add caches from Geocaching.com or import them via a GPX file or Pocket Query. After that, you can change the order of the caches, view waypoints, create a print list and export your route as a GPX file for your GPS.
GeoRoutePlanner is intended for geocachers who want to easily prepare a route in advance. You can put caches in the desired order, view waypoints and use a clear cache list or GPX file during your trip. The app is especially useful for walks, bike rides and routes with many caches or extra waypoints.
The first version of GeoRoutePlanner was developed for Google Chrome and is available via the Chrome Web Store. Because GeoRoutePlanner is a browser extension, the tool may also become available for Microsoft Edge and Firefox in the future. These versions will be investigated and tested later.
Yes. GeoRoutePlanner also works on a Mac, as long as you use Google Chrome.
The extension runs in the browser and is therefore not a separate Windows program. As a result, you can use GeoRoutePlanner on both Windows and macOS.
No. GeoRoutePlanner does not work in the regular mobile version of Google Chrome on a phone or tablet. Chrome extensions are generally intended for use on a computer. That is why GeoRoutePlanner is best used on a desktop computer or laptop.
Yes. With a Premium membership of Geocaching.com, you can create a Pocket Query yourself and import the ZIP file into GeoRoutePlanner. GeoRoutePlanner reads the caches from the file and, where available, also includes waypoints and additional GPX data.
Yes. To add caches directly from Geocaching.com to GeoRoutePlanner, you need to be logged in. GeoRoutePlanner only uses the data visible on the cache page you open yourself. Which data is available therefore depends on your Geocaching.com account and the cache page you view.
Yes. You can also import a separate GPX file into GeoRoutePlanner, for example a cache list, a GPX file for one geocache or an export from another program.
Yes, when waypoints are available in the GPX file or Pocket Query. For each cache, you can show or hide the waypoints in the cache list. In the settings, you can also specify whether waypoints should be included in the GPX file you export.
Waypoints are only available when they are included in the imported GPX file or when GeoRoutePlanner can read them from Geocaching.com. For some caches, waypoints are hidden, empty or not visible on the cache page you opened.
Yes. With the Waypoint feature, you can add your own locations to your route, such as parking, start point, finish, camping or picnic spot. You can enter a waypoint with a coordinate, but you can also add one directly by clicking a location on the map.
Yes. You can easily drag caches in the cache list to the desired position. You can also click the route number and enter a new row number directly.
Yes. With the plus sign next to a cache, you can add your own text. This text is also shown on the print list. For waypoints and hints, you can also edit the existing text or add your own notes.
Yes. In the cache list, you can change the coordinate of a cache. This is useful, for example, when you want to use a solved mystery, a changed final location or your own route point.
When you open a cache on the Geocaching.com map that is already in GeoRoutePlanner, you will see the message ‘✓ In cache list’. The button then changes to ‘Update in GeoRoutePlanner’. This lets you retrieve the cache data again, for example when the coordinates have changed or new information is available.
Yes. With ‘Print list’ you create a clear, printable cache list. The list includes the route number, cache type, GC code, cache name, coordinates, hints, waypoints and your own notes.
Yes. In the map view, you can print the map. You can choose from several formats, such as A4 portrait, A4 landscape and A5.
Yes. With ‘Export GPX’ you create a new GPX file that you can put on your GPS.
GeoRoutePlanner tries to preserve as much extra geocaching data as possible, so your GPS can show more information while you are out.
That depends on your GPS device and on the data available in the original GPX file. GeoRoutePlanner includes as much usable information as possible in the exported file. However, some GPS devices do not show all data or fields.
Your route data is stored locally in the browser on your computer. GeoRoutePlanner does not send your cache list, GPX files or own notes to Geocachinginfo.nl or to its own server.
Yes. Use the ‘Clear’ button to delete your current route. You can also remove GeoRoutePlanner or clear the browser storage. This also removes the saved route data.
No. GeoRoutePlanner does not send your route data to its own server or to Geocachinginfo.nl. For the map view, map tiles are loaded from external map services. If you click a link to Google Maps yourself, Google Maps opens outside GeoRoutePlanner.
Not yet. A translation feature is on the list for possible future updates. Such a feature will probably require an external translation service, which may have implications for privacy and possible costs.
The GeoRoutePlanner interface is available in Dutch, English, German and French.
You can choose the desired language with the flags in the menu bar.
First check whether you are using the latest version of GeoRoutePlanner. Then refresh the Geocaching.com page and open GeoRoutePlanner again. Does the problem remain? Note which cache or page it concerns and exactly what you did before the problem occurred. With that information, we can investigate and improve GeoRoutePlanner more effectively.
Also take a look at our online tools overview or the code tables overview.
Do you already follow Geocachinginfo.nl on Facebook or Instagram for the latest updates?